The Word 2010 gallery makes adding a basic table of contents quick: Click the References tab, click Table of Contents, and then click the gallery table of contents you want.
But what if you want more? What if your table of contents needs to provide different information–more levels, or fewer levels? What if you want a table of contents at the beginning of each chapter? What if you want to change the font?
Microsoft Word
Put your best words forward with an Office 365 subscription.
Here are some of the ways you can customize your table of contents.
Quick reminder: Before you start, be sure you’ve applied styles to your headings. If you want to use a custom style, skip ahead to #4. You can always scroll back to catch the first three tips.
1. Change the number of levels in the table of contents
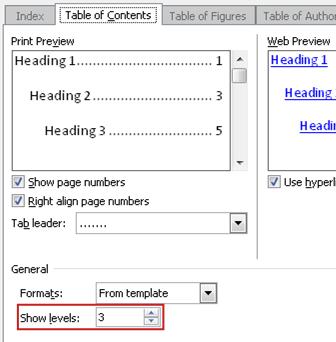
Click in your table of contents. Now click the References tab, click Table of Contents, and then click Insert Table of Contents. (You’re going to replace the existing table of contents with the one you want.)
In the Show levels box, type the number of levels you want to display in the table of contents.
After you click OK, Word asks you whether you want to replace the table of contents. Click Yes.
The field code short cut
Click in your table of contents, and then press Alt+F9. You’ll see a field code that looks something like this:
{ TOC o “1-3” h z u }
The o switch determines how many levels are in the table of contents. Change the numbers in the quotation marks. For example, if you want to show only two levels, change “1-3” to “1-2”.
2. Add a table of contents for each chapter or section
To add separate tables of contents, you add a Word bookmark to the chapter or section (or a separate bookmark to each chapter or section). Then you add that bookmark switch to the table of contents code.
If you want to use a level-1 heading but you don’t want it to look like the default heading style, you can create your own heading style and use it for your table of contents.
First, format the heading the way you want it, and then select it.
Click the Home tab. In the Styles gallery, click the More button, and then click Save Selection as a New Quick Style.
Give your new style a name, and then apply it to all the headings you want.
Now, when you’re ready to insert a table of contents, click References, click Table of Contents, and then click Insert Table of Contents.
Click Options, and then scroll to find the name of your new style. Type the heading level you want it to have in the box, and then click OK.(In this picture, TOCBody is the name of my new style.)
Click OK again to insert the table of contents.
5. Change the font in a table of contents
Click the table of contents (if you’ve already inserted one).
Click References, click Table of Contents, and then click Insert Table of Contents. (Again, you’re going to replace the existing table of contents with the one you want.)
Click Modify, click one of the heading levels, and then click Modify.
Click Format, click Font, and then make the font changes you want.
Click OK, and then click Modify again to make the changes for the next level. (You change each level separately.)
When you’re done changing the font for each level, click OK, and then click OK again to insert the table of contents.